CertifiQ Display — Setup & FAQs
Every collectible has a story. Tap • Verify • Own.
Photo Submissions
To help your cards receive the best evaluation for authentication, high-quality photos are essential. Here are some simple tips to ensure your images are sharp, clear, and grading-ready:
- Lighting matters: Use bright, natural daylight when possible—shoot near a window or outdoors on a cloudy day for even lighting without harsh shadows.
- Avoid glare: If shooting under a lamp, diffuse the light with a thin white cloth or bounce it off a wall to minimize reflections on the card’s surface.
- Use a plain background: Lay your card flat on a neutral surface like white poster board or a soft cloth to keep focus on the card.
- Position and angle: Align your camera directly above or facing the card head-on—avoid tilt or skew by using a tripod or propping your phone securely.
- Fill the frame: Zoom in or move closer so the card nearly fills the frame—this maximizes detail and resolution while keeping the background minimal.
- Lock focus and exposure: Tap the card on your phone’s screen to focus. If available, lock focus (AE/AF lock) so the phone doesn’t refocus or change exposure while capturing.
- Steady as you go: Hold your hands steady or brace your elbows. Even better—use a small stand or stack of books to support the phone for crisper shots.
- Resolution counts: Always shoot in your camera’s highest setting. Shooting in 12 MP or higher ensures graders can zoom in without loss of detail.
- Multiple angles: Capture both the front and back of the card. If the card has surface details or potential scratches, take a few angled shots to reveal texture or gloss.
- Why it matters: The clearer and more detailed the image, the easier it is for graders to assess mint condition, edge sharpness, centering, and surface flaws. Sharp, well-lit photos significantly improve the accuracy of authentication—and your card’s potential grade.
Tip: If your token brought you here, it will already be filled in on the upload page.
Setup Instructions
- Open the box. Carefully pry the lid using a flat-head screwdriver at the notch, then lift straight up.
- Prepare the plexiglass. Remove the protective film from both sides of the UV acrylic (plexiglass). If you have a double-sided display configuration, repeat for the back acrylic.
- Place your card. Place your graded card (or card saver) into the center slot so it sits upright and centered.
- Install the NFC token (optional). If you purchased an NFC token/medallion, mount it in the top recess. Twist slightly clockwise to lock it.
- Reinstall the plexiglass. Slide the UV acrylic into the front slot. If applicable, repeat for the back slot.
- Close & display. Press the lid down firmly until fully seated.
- Mounting prep (back side). Apply the 3M hanging tab at the top-center. Add bumper pads to the bottom corners to keep it level and protect the wall.
If you’re activating your token for the first time, start at the activation flow, then submit your photos at r.certifiq.tech/upload.
Quick Actions
Most people start here.
Back Diagram
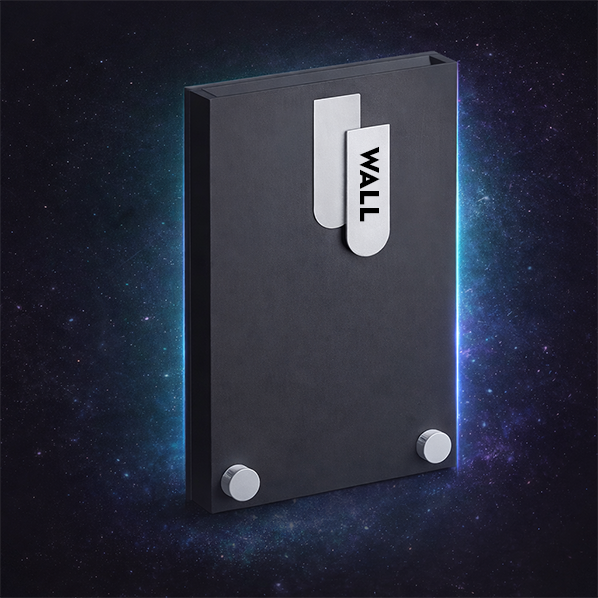
- Steel wall-mount tab at top-center
- Bumper pads at each bottom corner
Front diagram removed (the design changed). We’ll publish an updated front diagram in the next documentation pass.
Frequently Asked Questions
What does the NFC token do?
Do I need a Web3 wallet?
How do I set up a wallet?
- Install MetaMask (iOS/Android or browser extension) or Coinbase Wallet.
- Create a wallet and securely back up your recovery phrase. Never share it.
- Use the Polygon network when interacting with CertifiQ collectibles.
- Return to CertifiQ and connect your wallet when prompted.
No crypto is required for viewing. Gas fees may apply for transfers.
How do I upload my collectible?
You’ll submit high-resolution front/back photos plus a few details (grader + cert # if graded). If your collectible is raw, cert # is optional.
How do I claim ownership of my collectible?
If you didn’t have a wallet ready during upload, you can complete wallet setup later at certifiq.tech/wallet.
How do I transfer ownership?
- Open the CertifiQ viewer or your Web3 wallet/NFT platform.
- Select the DOC/NFT you want to transfer and choose Transfer or Send.
- Paste the buyer’s wallet address and confirm the transaction on Polygon.
What if I bought the card but the DOC wasn’t transferred to me?
Your best options are:
- Contact the seller and ask them to transfer the DOC to your wallet address.
- Make future deals include “DOC transfer included” as part of the terms.
Where can I view the NFT?
Is this secure?
Troubleshooting tips
- NFC won’t scan: Ensure NFC is enabled on your phone; try tapping near the top/back where the reader is located.
- Page didn’t load: Check your internet connection or try a different browser.
- Wallet won’t connect: Make sure you’re on the Polygon network in your wallet.
- Transfer stuck: Wait a minute and refresh; Polygon confirmations are usually quick, but congestion can delay.